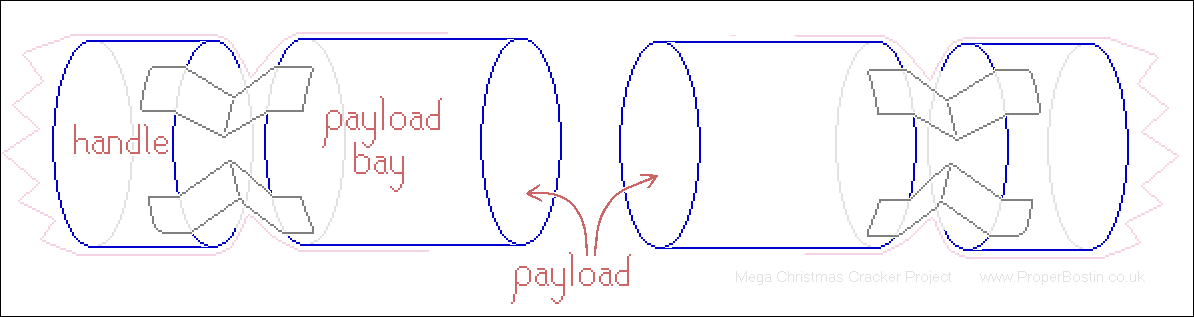
The Mega Cracker is designed to break in the middle... it is not the kind that may break at either end, so you can't have that un-Christmas-y, dog-eat-dog, rule where the person who gets the main body of cracker when it cracks, wins the gift. Ideally the contents should be shared... but if sharing is too much to expect of the young cracker pilots then you could always put two of each gift in, or even label each gift with a name.
The below instructions are reasonably detailed, some may need to follow them all, others may only need to look at the photos and just scan the text for dimensions and some construction techniques for the more fiddly bits.... it just depends how much of this kind of stuff you've done.
Safety First! This is very much an At Your Own Risk project... watch-out when pulling these crackers since it's a stand-up two person task: make sure if anyone was to fall back that there is nothing sharp/spikey/hard etc that you might fall on, and be prepared for the cracker to give way suddenly. Make sure your feet have plenty of grip (a bad example would be socks on a shiny tiled floor)... having good grip on the floor is also essential for a good clean cracker pull anyway. I suppose there is a slight risk of getting a spark in your eye from all the many cracker snaps used -- any normal risk is multiplied. I've noticed this Christmas when looking at crackers from the local supermarket that the snaps in them are a bit stronger (and more sparky) than they used to be so eye protection would be a good idea. And I suppose you might get a flying gift in your eye if you were very unlucky. Of course, employ all the usual safety methods when using knives/scissors, keep your fingers behind the blade (away from the cutting direction) and generally make sure any part of you won't get cut if the blade slips.
What is needed:
Some corrugated cardboard boxes to cut-up. (Use boxes made from single ply corrugated cardboard)
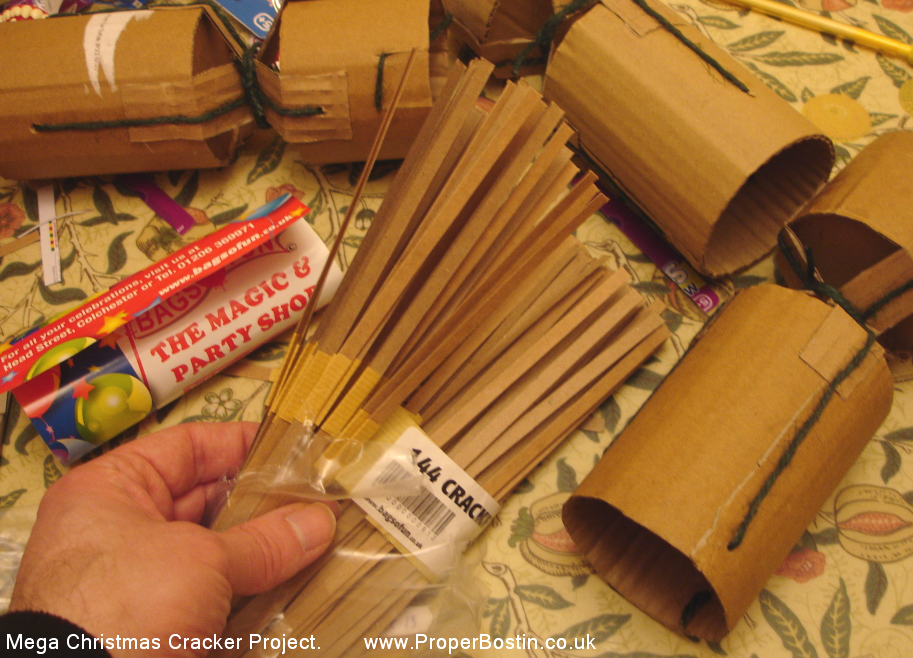
A packet of cracker snaps. (For example:www.megapartyshop.com/cracker-snaps-28cm-11-pk144) Each Mega Cracker uses about 20 individual cracker snaps.
Jute string, or gaffer tape (aka: duct Tape, A-team tape).
Some wrapping paper to wrap around the whole thing as the decorative skin.
A sheet of thin card (about A4 size, NOT corrugated cardboard).
Toys, gifts, curios, puzzles, jokes, hats -- whatever you want to put in as the payload.
A cylinder (e.g: a tin can, a coffee jar etc.) to use as a former.
A pot of wood glue, and something to spread it with. (Evo Stick Wood Adhesive -- the weather-proof or the interior sort)
A pair of sturdy scissors (strong enough to cut the corrugated card).
A sharp knife (for cutting the thin card).
Sticky tape, plastic cloths pegs, rubber bands, small clamps etc. (to hold some surfaces together while the glue dries).
Notes about the cardboard needed: Find cardboard boxes (for cutting-up) made of single ply corrugated cardboard (consisting of a stiff sheet of corrugated paper sandwiched between two sheets of stiff flat paper -- the most common sort). If you get cardboard which is two ply it will be too difficult to bend into a tube shape. Don't use cardboard which has some shiny printing or labels on it as the wood glue may not stick to those areas.
Step 1. Find a Cylinder.
Decide how big you want your payload bays to be. To decide this you'll want to know how big the gifts etc are that you want to put in.
You could search toy stores like Hawkins Bazaar (where I ordered from last time www.hawkin.com
, I mainly looked in the "/pocket-money" section for the small toys).
Hawkins, and hopefully other stores, give the approximate size of their small gift items which is vital for this project: allowing you
to get an idea of how big to make your payload bays (of course even better if you can order early and have the toys etc to hand during Mega Cracker construction.)
Then have a look round your home to find something which is basically a cylinder the diameter you want, for example: a tin can, a coffee jar...
what ever you end-up using will be the former for rolling cardboard around to make the hollow payload bays. Make sure the cylinder
you use isn't something
you value because it could get a fair bit glue-y. Do not use a wooden or cardboard cylinder former because the would glue
we will be using will stick to it like, err, glue... if you need to use anything like that put cligfilm round it first.
If you use an empty container you can also try fitting
the payload (toys, gifts etc) in the container temporarily to get a better idea of whether the payload bays you form around it would be large enough.
I think it's best to have a little spare elbow room inside the payload bays so that the toys etc. aren't wedged-in and can fly-out when the cracker is pulled
(assuming there is nothing fragile of course) and also you need a bit of extra space for the cracker snaps to be accommodated (see final steps).
You can see on the far left in the photo below, the can I used as the former for my payload bays.
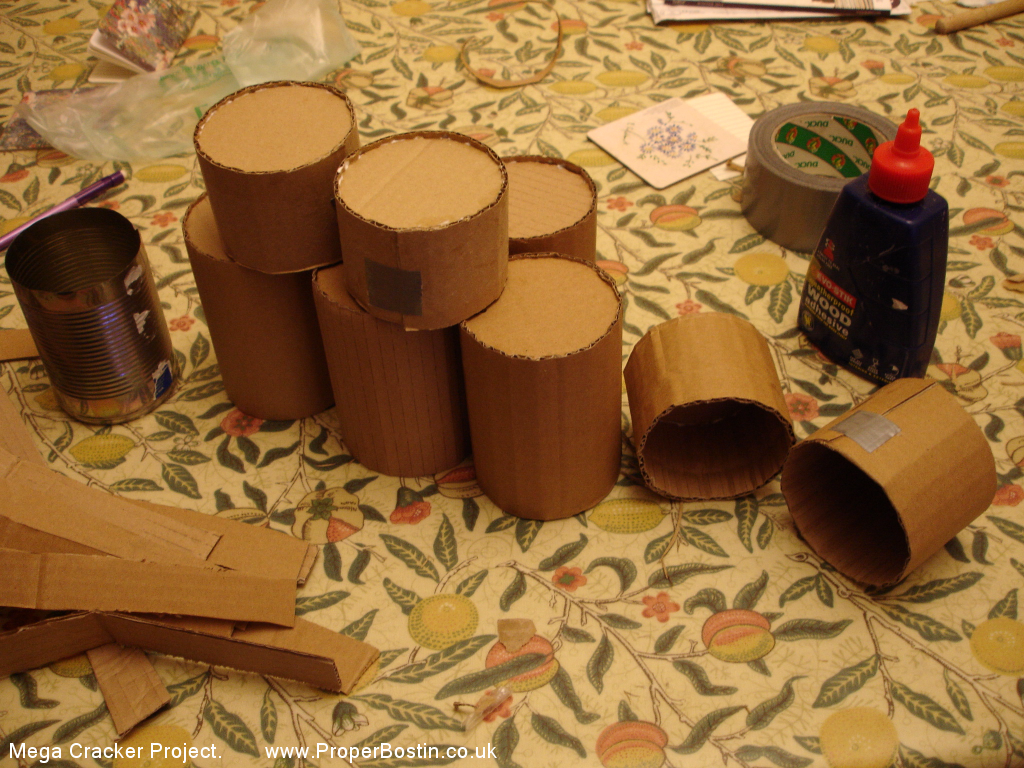
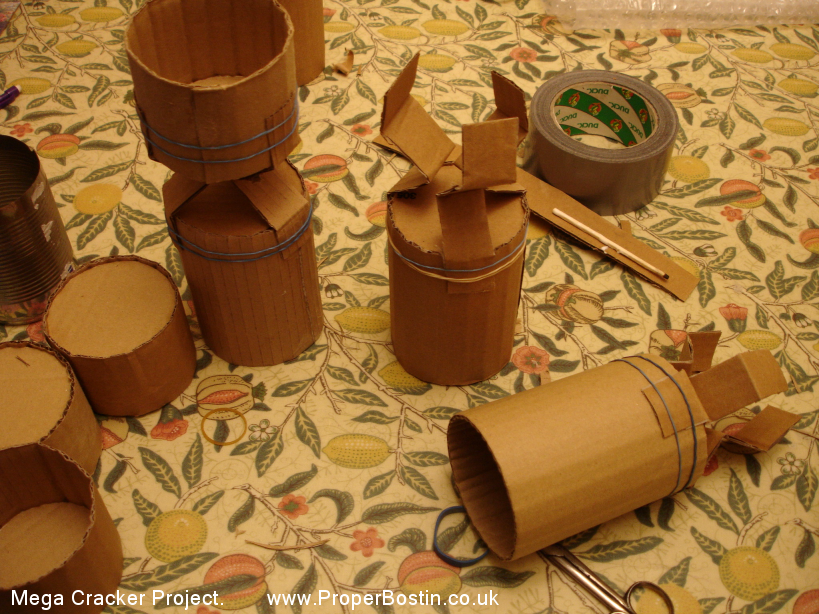
Step 2. Make the Payload Bays. ~ (See also possible alternate method in the update at the bottom of this step)
In the above photo you can see the completed payload bays and handles: 2 handles and 2 payload bays for each cracker (I was
making two mega crackers so I had 4 payload bays and 4 handles).
Decide how long you want the main body of your
cracker to be (not including the handles): then each payload bay will be half that length... cut two strips with a width of that "half main body length" dimension.
The strips have to be long enough to wrap around your cylinder (the former) and have about half an inch or 1cm over-lap so that they can
be glued there.
Cut the cardboard strip perpendicular to the direction of the corrugations so that it curves-round the cylinder easily.
For each cardboard strip: wrap it round the cylinder and glue where it over-laps with the wood glue. Put a piece of tape or two across the join to hold it while
the glue dries. The glue should be left to harden for about 3 hours before removing the tape. Wood glue works excellently on cardboard and paper
and will be super strong (after about 24 hours), which is just what you want for Mega Crackers because they are subject to high stresses
and we only want them to break in
the one desired location (i.e. parting the two payload bays, dividing the cracker in two). Don't pull the strip around the cylinder former
so tight that it will be difficult to remove the former, but tight enough so that a good curve is formed.
Give a bit of a press along the glued join to make sure
the two surfaces are properly in contact.
Remove the cylinder former before the glue is dry because even if your cylinder isn't
wood or cardboard the glue might stick to it a bit and make it difficult to remove if left too long... and
removing it earlier also enables you to get-on and make the
next payload bay (and later the handles, see below). You should now have a nice cardboard tube.
(In the above photo you'll see there is still some tape on the joins to be
removed later when the glue is dry.)
Don't worry too much if you have used too much glue (better to use a bit too much
rather than not enough)
... you can wipe off the surplus... the glue dries translucent anyway and moreover you are going to cover the whole cracker with some
Christmas-y paper and that will hide a multitude of sins.
The last job for the payload bays is to make an end piece for each one, which is basically a circle, a disc, of card.
Draw around the end of your cylinder former
onto some cardboard and cut it out the best as you can. Ideally, wait until the glue is dry on the cardboard tube you have made for each payload bay
because what you then want to do next is insert the cardboard disc into the end of the cardboard tube (to make an open-ended cylinder).
It should be a reasonably snug fit.
If your cardboard disc is too large adjust it accordingly by snipping the extra off from around the circumference, or rolling the disc on
it's edge, on the table, to splay or squash around the edge to make it a slightly smaller diameter. If your disc is too small on the other hand
the only option is to try again and cut another disc. Once you have the fit right, put glue around the edge of the disc and around the inside
of the edge
of the cardboard tube you made (the end where you have been testing it). Insert the disc into the end of your cardboard tube
so that it there is a millimetre of cardboard tube showing all the way around (see above photo).
If it proves tricky to get the disc square in the end, temporarily re-inserting the former might help. If you have done a good job
then after about 24 hours you can remove the tape and you will notice that the open ended cylinders you have made (for the payload bays)
are very rigid and strong, probably much stronger than you thought anything made from corrugated cardboard could be.
Update: I have thought since writing this article that some containers of food are made from cardboard. For example Pringles tubes, and the dried/powdered milk container from my local supermarket (Tesco), also Green and Black's Cocoa poweder is in a similar container. These could be used as the payload bays and handles if you cut them to length (although I've not tried it myself yet). These continers have a metal bottom but the main tube is made from cardboard. The wood glue won't stick to them as is (or not very well) because of the shiney printing on them, so if you wanted to use them you would have to use abrasive paper (AKA sand paper) to sand-off the print down to the cardboard. I've not tried doing it this way yet so do an experiment to see if the glue sticks well before making the whole cracker.
Step 3. Make the Handles.
The next thing to do is to make the handles. It is the same process as for making the payload bays above, except they don't have to be as long...
and of course you don't have to worry about fitting any presents in them or anything. Use the same cylinder former as you did for the payload bays.
You can see in the above photo -- that shorter cylinders of cardboard are the handles and the taller ones are the payload bays. There's
no rule about how long the handles should be, but they probably want to be at least 2 and a half inches long for the sake of strength.
My handles were a bit more than half the length of each of one of my payload bays ( payload bay length * 0.55 ).
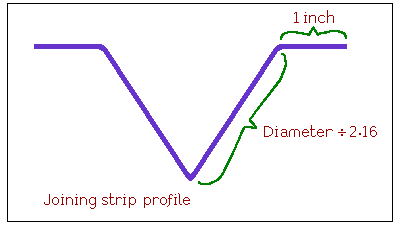
Step 4. Make the Joining-Strips.
The joining-strips hold each handle onto its payload bay. See below diagram and photo. There are 6 joining-strips required for
each cracker (3 per handle). For each one cut a strip of corrugated cardboard about 1 inch wide (25mm). This time cut along, with the corrugations of
the cardboard. The length of the each strip
is something you'll have to
calculate because it depends on the diameter of your cracker. Measure the outer diameter of your payload bays and divide that by 2.16
Then multiply that number by 2, and add 2 inches (or 51mm) ... that's the length of all your joining-strips. In each strip
you have to make 3 folds (see the below diagram)... mark the strip half way along and also 1 inch from each end and fold
on those three marks...
fold the middle one in one direction and fold the other two folds in the opposite direction.
Step 5. Join Handles with Payload Bays.
It's time to join the handles to the payload bays using the joining-strips. Get some elastic bands ready to use for holding the joints
while the glue dries. Observe where the strips are glued onto the payload bays and handles in
the above and below photo. It is best to start by doing one payload bay: gluing one end of three strips to it.
The strips are to be glued to the end of the payload bay
that you glued the cardboard disc into i.e.: the closed end. For each of the three strips put glue on one end -- on the 1 inch area nearly up to the first fold
(on the inner side of the fold if that makes sense, see photo anyway). Apply each one (of 3) to
the payload bay equally spaced around the circumference... the spacing is not critical, no need to measure it as long as it looks about right.
Although the spacing round the circumference is not too important, make the strips as in-line with the tube of the payload bay as best as you can
(or put another: way make the strips as square with the end of the payload bay as you can).
The nearest fold to where you're gluing each joining-strip, should be just over the edge of the end of the payload bay so the strip can bend
freely at that fold. Leave the rubber bands-on for a few hours 'til the glue dries.... but before that,
assuming the elastic bands are strong enough to
hold things in place in the meanwhile, you can glue the handle onto the other end of the three strips that you just joined to the payload bay.
To join-on the handle, put glue on the other end, the other 1 inch area, of each strip, on the inside surface. Splay the ends of
the strips apart a bit, if need be, and introduce the end of the handle, as far as the first fold of the strips.
Just like with the payload bay: the end being glued should be the closed end, the end you've glued the cardboard disc into.... so the closed
end of the handle and the closed end of the payload bay should be nearest to each other (facing each other in other words).
Put elastic bands around the handle and the strip ends, and while the glue is still wet make adjustments: make the joining-strips in-line with
the payload bay tube and the handle tube also in-line with the payload bay tube.

Step 6. Add Tensile Strength.
The thing to do next is to add tensile strength especially to the joining-strips where the cracker would probably well otherwise fail.
It's inherent problem with the shape of the cracker -- where it's thin and folded it is likely to break.
We can't risk the cracker
breaking anywhere except round the middle between the two payload bays or it will be a total anti climax: the cracker snaps would not
go off and presents would not come out (or even be accessible).
You can add tensile strength in one of two ways:
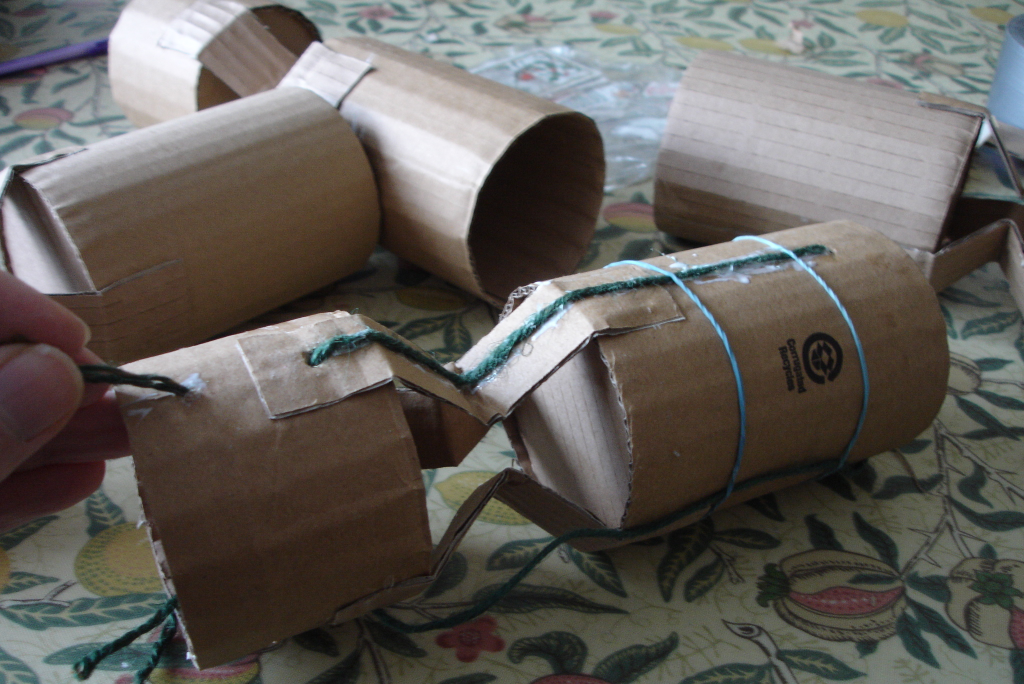
(Method 1) Glue some jute string down the length of the payload bay, joining-strips and handles to make sure they can't break anywhere along there. See the below photo. (BTW, you can see I secured the ends of each string by poking a hole in the cracker payload bay and putting the end though and knotting it, but after testing last Christmas I don't think that level of belt'n'braces is necessary, I think just gluing the string down onto the cardboard is good enough provided it is glued all the way down to the open end of the payload bay and handle). Do one handle and payload bay assembly at a time: 3 pieces of string for each assembly (one for along each joining-strip). Each string should be as long as one handle and payload bay assembly plus a few inches to account for where the joining-strip folds-in (best to err on the side of making the string too long as you can cut off the excess length later). For each length of jute string put plenty of glue in a thin strip along where it will be laid (all along the payload bay, joining-strip and handle) -- plenty of glue because the jute string is quite absorbent. Lay the string down onto the glue: start from one end near the open end of the payload bay and lay the string down onto the glue (don't stretch it)... towards the joining-strips, when coming to the joining-strips lay the string well into the fold and continue laying the string all the way down to the open end of the handle. Cut off the excess string if any sticks out past the end of the handle. Once you have laid down 3 lines of string use a lot of elastic bands to hold the string down to the cardboard while it dries. You could use plastic cloths pegs to hold the string into the joining-strips. If after drying you think any of the strings are not glued very well to the payload bay or handle you can always glue a second piece of string along the side of it.
(Method 2) The alternative method is to use 1 inch wide strips of gaffer tape (otherwise known as duct tape). This is probably the easier of the 2 methods, but only if you can buy the tape on a roll about an inch wide because if you have wider tape, cutting long strips down to the required width is quite tricky, because it has devilishly sticky adhesive and if one bit of adhesive even only slightly touches another for a split second you can all too easily end up with a ball of scrap tape. For each joining-strip: stick one contiguous strip of gaffer tape running all the way along the payload bay, along the joining-strip (and into its fold) and all along the length of the handle... and at the open end of the handle and payload bay fold- over about half an inch into the cracker. Don't stretch the tape as you are sticking it down to the cardboard. Stretching tape as you stick it down is tempting because it guarantees no wrinkles and it gets it nice and straight, but generally speaking there are two problems that may occur by stretching the tape because most tape has at least some elasticity and if stuck down stretched it will gradually start to peel itself away and become unstuck over time as it tries to shrink back to its original length... or if it does not peel it could instead deform what it is stuck to making it curve-up. Use the back of your finger nails or the bowl of a tea spoon to press down the length of tape onto the cardboard to make sure all the adhesive is well stuck down all over. One problem with this method is that it will give you less space to stick on cracker snaps to the open edge of the payload bay (see below photos) because the wood glue does not stick to the plastic of the gaffer tape.
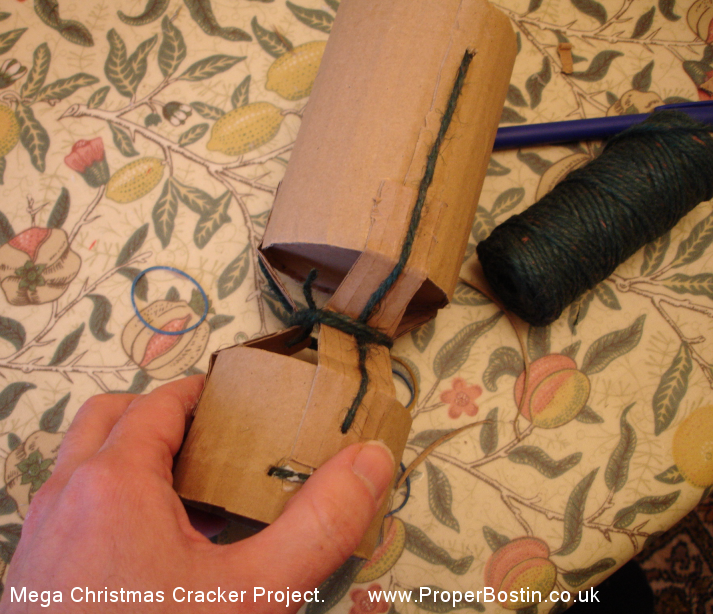
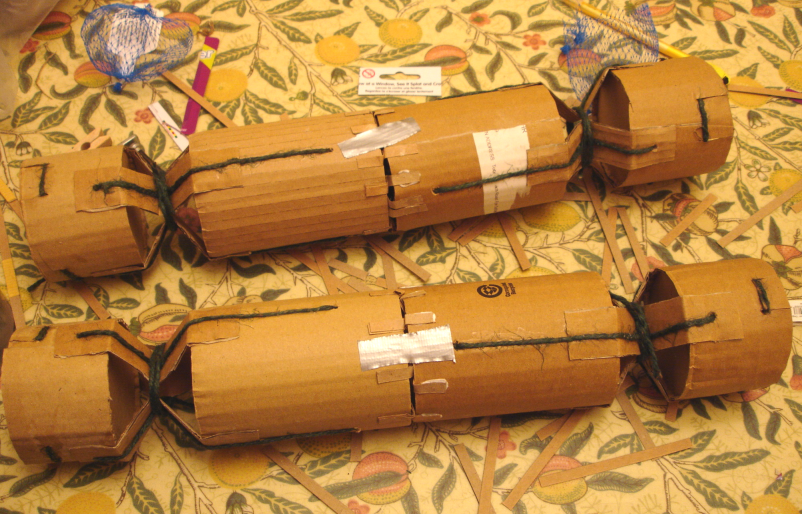
Step 7. Tie Around the Cracker Joining-Strips.
Once you have strengthened the joining-strips, tie around their 'waists' as per the below photo, this will make sure each
of the two waists stay there
when being pulled hard. Don't make the string tight -- it should not significantly pull-together the handle closer to the payload bay.
Step 8. Stick-on the Cracker Snaps.
I ordered my cracker snaps from here: www.megapartyshop.com/cracker-snaps-28cm-11-pk144
-- a packet of 144 for (at the time of writing this) �6.12 (I think www.megapartyshop.com is the online shop of www.bagsofun.co.uk)
But it turned-out 144 is way more than I needed, so what I ordered will last me quite a few years.
I used about 20 snaps on each cracker... use more if you dare, but you probably want at least 18. I think the next ones
I make I will try 30 snaps. The store I used does do smaller packs BTW.
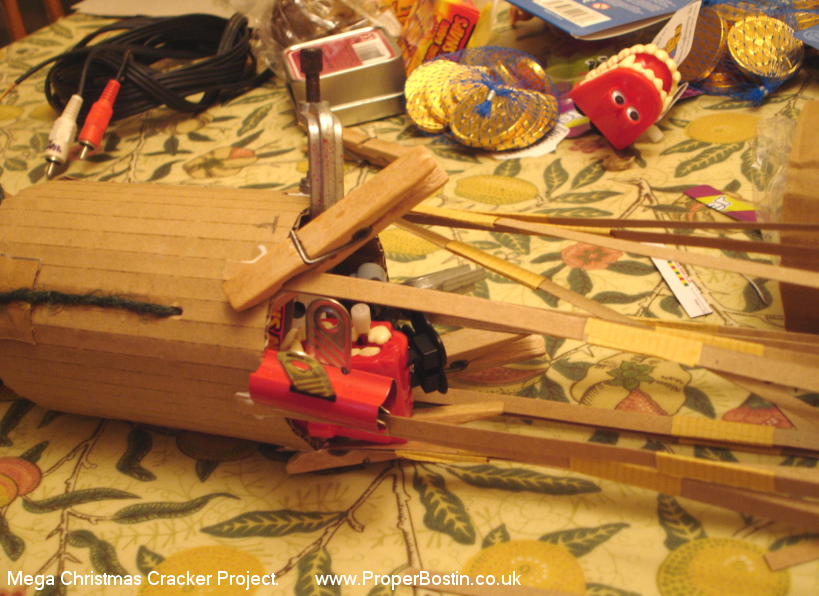
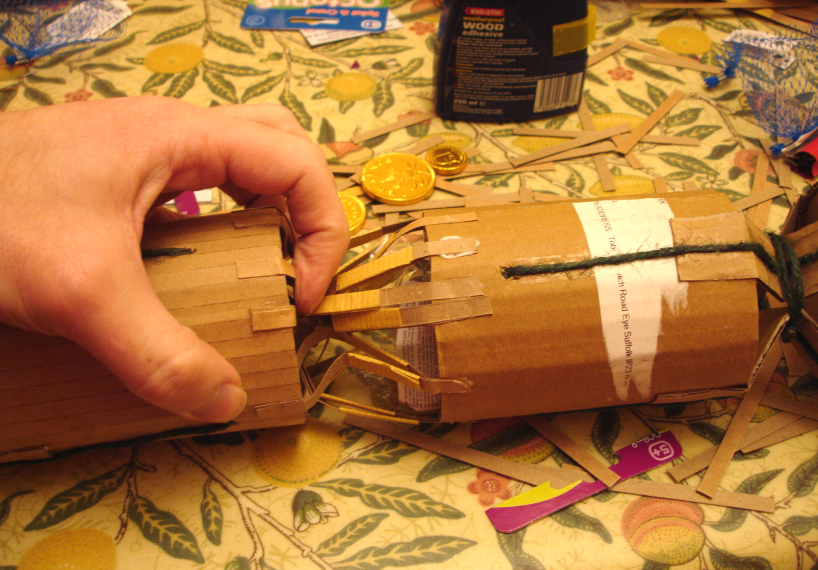
Basically what you do is take one handle and payload bay assembly and stick the one end of many cracker snaps all round the outer edge of the open end of the payload bay (see the 2 photos below). Before you stick-on each cracker snap cut it down to a random length. Make some short and some long. The shortest ones should have at least 1 and a half inches either side of the centre snapper section remaining. Obviously, don't cut the actual snapper section (the light brown paper band) or it won't work. The idea with cutting the cracker snaps different lengths is that they won't all go simultaneously as you pull the mega cracker: so you will get many little bangs over about 1 second (depending on how quickly it is pulled) and also the most friction is felt just as each snap bangs, so spreading the bangs makes for a smoother pull. Of course you can make them all the same length if you like if you want one big single bang, but I've not tested that configuration.
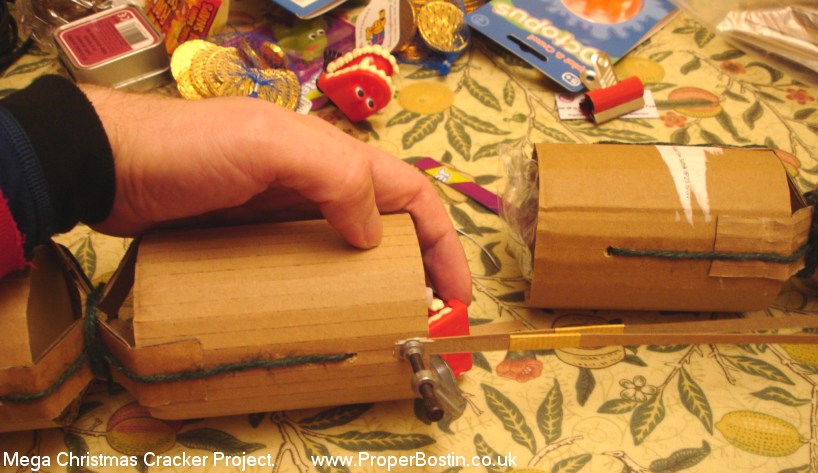
If you managed to get any, here is where the plastic clothes pegs will come-in very handy to hold the ends of the snaps while the glue dries. As you can see from the below photo I used whatever I had about the house to hold things: little clamps, bulldog clips, and at one stage wooden pegs. You might have noticed the word "wooden" in that last sentence, and with the fact that we're using wood glue may have quite correctly set-off alarm bells in your mind: I had to make bloomin' sure I didn't leave the pegs-on too long or they would have been stuck there for good, and one did take quite some parting. So I definitely don't recommend wooden pegs!
You can see in the above photo I've actually put all the gifts into the payload bays before sticking the cracker snaps onto the first payload bay... but you could leave packing the payload until just before you stick the other end of the cracker snaps to the second payload bay, but don't leave it any later than that or it will be quite tricky getting the larger gifts in and in any case you won't be able to arrange things as well.
Space the cracker snaps roughly evenly round the circumference (if you were to put them all on one side the cracker would not pull evenly). Put shorter cracker snaps on opposing sides and longer ones on opposing sides etc, to even the load as their cracker gets pulled. I have stuck two snaps per location but it's only because I didn't have many clamps, pegs etc, you could stick them on each to their own location if that's easier. Stick the cracker snaps on as in-line with the body of the payload bay as you can (like you did with the joining-strips) and this will make it much easier when sticking the other ends to the second payload bay.
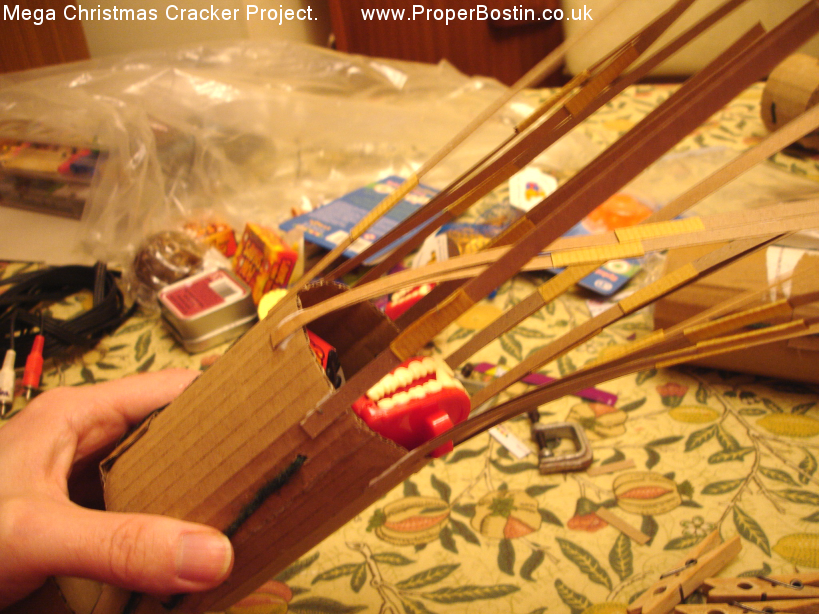
Once the glue is dry on the cracker snaps on the first handle and payload bay assembly, if you have not done so already, pack both payload bays with your toys, hats, jokes, sweets, curios etc. because it's time to stick the other end of the cracker snaps to the second handle and payload bay assembly. This bit is a bit fiddly because the gifts etc. keep wanting to fall-out and the differing lengths of the cracker snaps you cut make it even trickier. Line-up the 2 assemblies on the table, with each payload bay's open end facing-in towards each other (starting to form a whole cracker). The free end of each cracker snap has to be glued to the counterpart position on the second payload bay (see the below photo).

Start by gluing the longest cracker snaps across, then fold inward the centre of the cracker snaps you've glued-on towards the middle of the cracker to enable you to push the two handle and payload bay assemblies closer together to so you can then glue some shorter ones on, and so-on until you have glue the shortest completing the gluing of the cracker snaps.
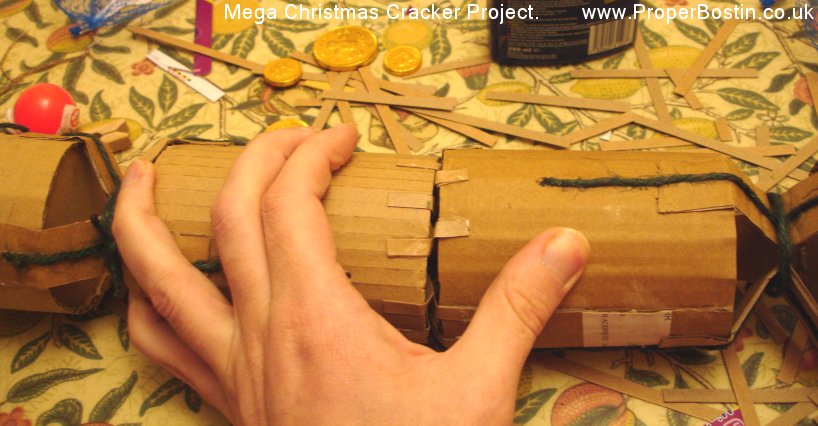
Step 9. Fold-in the Cracker Snaps and Close the Cracker.
When all the glue is dry on the cracker snaps and you have removed any clamps or pegs etc, it is time to pull the
two handle and payload bay assemblies together. Have a couple of
little pieces of tape cut ready.
Use your fingers to fold the cracker snaps into the middle of the cracker as you push the two
assemblies together. Stick the two assemblies together with the two bits of tape. The tape should be only just enough to hold
the two
assemblies together because remember that this is the place where we want it to break when it is pulled!
Step 10. Making the Breaking-Strip.
The cracker must break round its middle reliably when pulled but not accidentally when handling it before hand.
So to facilitate this we need to make a breaking-strip and glue it around the main cracker body.
Get some thin card (or very thick paper).
Cut it to the correct size: so that it wraps around your cracker leaving about an inch over-lap,
and if necessary shorten it so that it does not stick-over the ends of the payload bays.
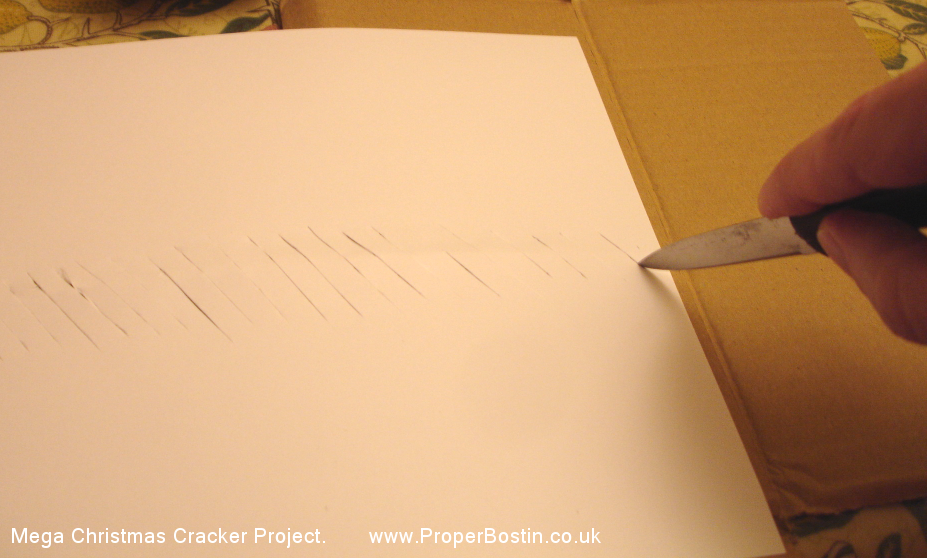
When it is the correct size, put the sheet of paper flat on the table on top of a wad of old newspaper or similar (because you will be cutting
down onto it with a knife). Draw a pencil line across the middle (so that if you were to wrap it around the cracker body again
the pencil line would roughly follow around where the two payload bays join). Now you have to make a row of diagonal cuts
along this pencil line like in the below photo. The row of diagonal cuts should be about an inch high and each cut about a quarter of an inch apart.
Along this line is where the cracker should split: my theory is that when pulled from both ends the diagonal strands of paper try and pull themselves
straight in line with the forces and as they do so they tear at the end of each cut. It is the small tearing action that I hope gives it the
reliable splitting along the row of cuts... ordinary perforations can be a bit unpredictable, relying on variable imperfections
in the paper or in the perforation holes.
Ideally you should make some test breaking-strips
and try them out so as to get the pulling force needed to split them about right because this will vary due to thickness of card etc,
(but I suspect most of you will be too eager to finish as we are nearly there).
When making each test breaking-strip: tape the ends around two cylinders (maybe the same sort of ones you used as formers)
and try pulling them apart with a friend.
If you were able to pull it apart and it split too easy: try another one making the diagonal cuts further apart or using thicker paper.
If on the other hand it was too difficult to pull apart try using thinner card or making the diagonal lines have an even steeper angle to them.
It is better that it be slightly too easy than too hard because the outer decorative skin will add a bit more resistance to the pulling.
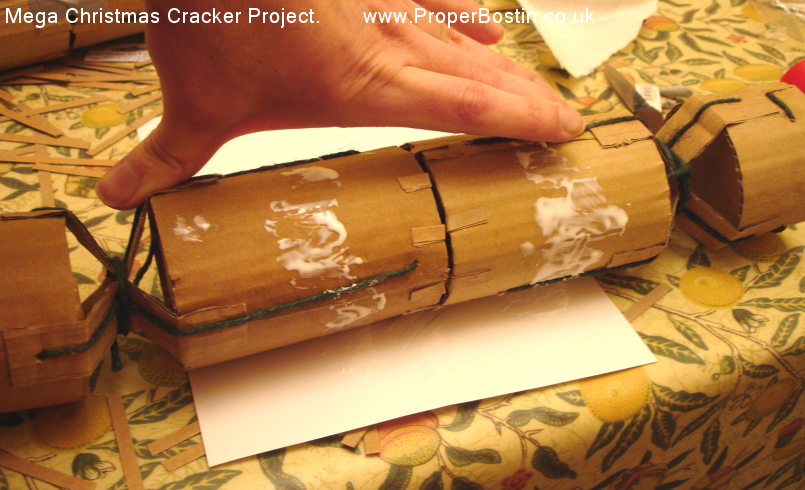
Step 11. Glue On the Breaking-Strip.
You now have to spread two strips of glue. One around each payload bay, about half way between where the payload bays join and their
respective handles. It is important not to get any glue near where the payload bays join, otherwise they might accidentally get
strongly glued together. Then roll the breaking-strip around the cracker as per the below photos. Don't put any glue or tape on or near the
row of diagonal cuts because that could alter the required breaking force required. The row of cuts in the thin card
should roughly match-up all the way around with the join between the two payload bays.
Put some elastic bands around the breaking-strips where the bands of glue are to hold things in place while the glue
dries. Remove the elastic bands when the glue is dry.
Now you have a cracker, although not a very pretty one at this stage because we still need to put the
decorative outer layer over the whole thing (see the next step).
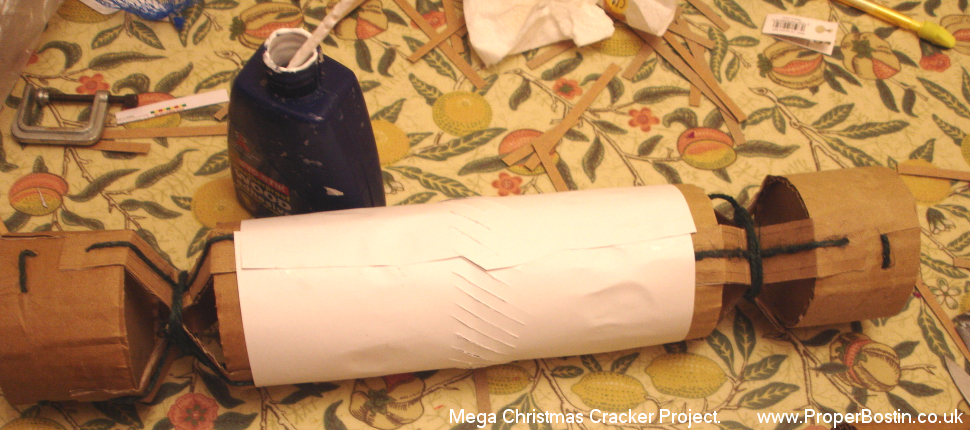
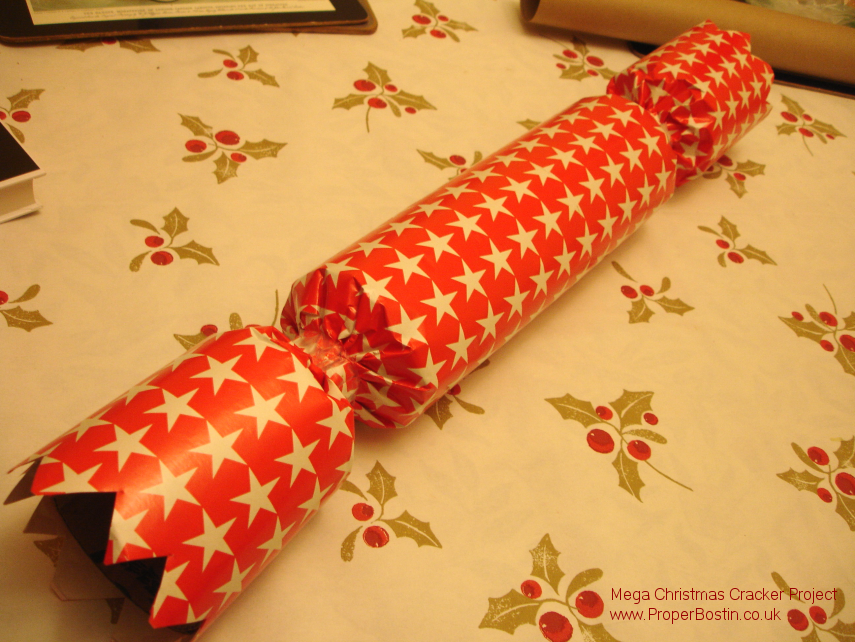
Step 12. Wrapping the Decorative Outer Skin Around the Cracker.
The decorative outer skin needs to be made from ordinary paper wrapping paper... don't be tempted to used plastic wrapping 'paper' or extra
thick stuff because that might effect the pulling force required. But if you want to further pretty it up you can add ribbon
or other paper provided it is not near the row of diagonal cuts on the breaking-strip so that it won't interfere with the cracker splitting.
Cut a piece of wrapping paper a few inches longer than the the cracker (longer to allow for where it will be crimped-in at the the waists and to allow a bit to hang over the ends of the cracker handles for pinking. In the other dimension it should wrap around the cracker with about an inch over-lap.
In the same way as you cut a row of diagonal cuts in the thin card for the breaking-strip, you have to cut a row of diagonal cuts (of a similar size and spacing) in your sheet of wrapping paper you have just sized-up. It is easy to forget this bit because you are so relieved to be finishing the project... but it is vital because even thin wrapping paper has quite high tensile strength -- so if you do forget it, the cracker pilots will be pulling like mad to get it to break open.
Roll the wrapping paper around the cracker lining-up the row of diagonal cuts roughly with the row of diagonal cuts in the breaking-strip underneath. When done you can secure the wrapping paper with a little glue or clear tape -- don't use any near the row of diagonal cuts though -- leave about an inch free from tape of glue either side of the row of diagonal cuts but glue elsewhere along the over lap out to the end of each handle.
Next you need to crimp-in the two waists between each handle and payload bay. You could do this by wrapping some string around and pulling it tight or you may have a way of pleating the paper for a neater look. Remove the string after the crimping is done. You can tie ribbon around the waists of course and add whatever decoration you like (except don't glue or tape over the place where the cracker should split along the row of cuts).
Step 13. Pulling the Mega Cracker.
Instruct the cracker pilots to stand facing each other (like a tug of war).
Make sure they stand on a surface with good grip and there is nothing
dangerous behind them that they might fall back-on. Each pilot should
grip round the waist at their end of the cracker and hold tightly with both hands.
On the count of three, or what ever you
agree on, each pilot should pull hard and should not stop pulling until all the bangs stop and presents
start flying out of the middle.
The end :-)
When the time comes: Merry Christmas!
![]()